1. CONNECTIONS
Scan Converter Installation Guide
|
Please note: The software included with your scan converter is OPTIONAL. It is not needed to make the scan converter work properly. This software is a screen control utility only. It is not a driver. If you have not installed the software and you are having trouble making your scan converter work properly, installing the software will not help. It is recommended that you install your scan converter and have it working before you decide if you need to install the software - in most cases it is not needed. |
There are three parts to setting up your scan converter - hardware installation, system setup, and software installation. Please note that there is extensive help on the AITech Web site www.aitech.com.
|
1. CONNECTIONS |
There are four connections necessary to hook up you scan converter. First, shut your system down, turn it off and follow the instructions below.

Figure 1 -The
image above shows the rear panel of a television set. Note the labeling
of the three connectors associated with the scan converter installation. You may
have
only one or two of these connectors on your TV.
Your TV has an "RCA" style VIDEO-IN connector. The TV must be switched to the VIDEO-IN (sometimes VIDEO1, Aux, Input, Vid, Line, Line In, etc.) mode selection. Pressing an INPUT, VIDEO, or similar button on the device or it's remote control most often does this switching. There is a chart on our Web site listing many brands and their method of switching. In some rare cases, the switching is done automatically.
IF YOU ARE UNSURE HOW TO MAKE THIS SELECTION, READ THE TV's MANUAL FOR HELP.

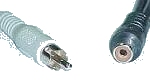
Figure
2 - Image showing the installation of the composite (RCA) video cable and
the S-Video cable.
Note: this is only an example - you will normally install only one cable.
An RF modulator has a Composite video input and has an "F" style output connector. The output connects directly to the antenna or cable input on your TV. Be sure that the channel selected on the TV matches the switch setting selected on the VCR or modulator (channel 3 or 4).
NOTE! An RF modulator is not the same device as the common video game connector box! Be sure that you are using a true RF modulator when attempting this kind of connection. See the VCRs manual for details on using it to show the output of the scan converter. The MultiPro CTV and the 1108 have a built-in RF Modulator eliminating the need for the purchase of a separate unit.

Figure 3
- The image above shows a typical Pocket Scan Converter 2000 installation on a
laptop computer.
If you are using a desktop computer your installation will differ only in the
placement of the VGA card connector
on the back of the computer and the need to plug your monitor cable into the
scan converter VGA pass through connector.

Figure
4 - The image above shows a close up of the monitor VGA connector
at the rear of a computer after it has been removed from the video card VGA
connector.
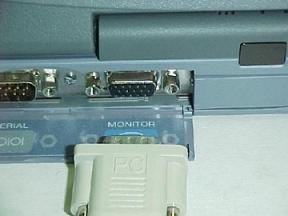
Figure 5
- The image above shows a close up of the VGA connector at the rear of a
computer.
|
3. LAPTOP USERS |
Your TV will have one or more of the following connectors.
|
|
|
|
|
"F"
/ RF signal |
RCA
/ composite |
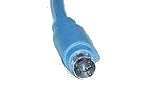
S-Video |
Figure 6 - Three types of video connectors
"F" Connector - This is a threaded connector used for the antenna, and Cable TV connectors. This is a standard connector for TV's, and VCR's. The "F" connector is for RF signals. RF signals combine the video and audio information into one signal.
RCA Connector - the industry standard for audio and video connectors on consumer electronics devices.
S-Video
- (separated video) This is the preferred type of connection.
S-Video provides the best image quality of the three connection types -
RCA provides the second best image quality.
SYSTEM SETUP -
If you have a MultiPro Plus, MultiPro
2000, or Pocket Scan Converter 2000, you can skip this section.
The scan converter requires four basic settings in Windows. These setting will be made differently depending on whether you use Windows 3.x or Win95/98. For Windows 3.x follow the instructions in the User's Manual. In Windows 95/98, you must make the settings shown below):
Desktop area = 640x480
Color Palette = 256 colors
Monitor type = Standard VGA 640x480
Refresh rate - 60 Hertz (Hz)
WRITE DOWN ALL
ORIGINAL SETTINGS BEFORE YOU CHANGE THEM.
Depending on which version of Windows you have, you may not see the exact dialog boxes shown below. However, you should be able to get the general idea of what you need to do with the information that is available here.
Right-click a blank area on your desktop - you should see the menu shown below.
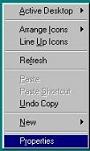
Figure 7 - right-click menu for desktop
Click the Properties selection at the bottom of the menu as shown above.
The graphics below illustrate the settings that must be made in Windows 95/98. The illustrations show a Windows 98 installation. Note the setting for 256 colors in the Color Palette, as well as the setting for 640x480 for the Screen Area.

Figure 8
- Display
Properties showing Color and Screen Size settings
You should have four or more tabs showing (figure 8). Click the Settings tab. The setting for the Color Palette is on the lower left, and next to it on the right is the setting for Desktop Area. Set these as directed above and shown in figure 8. You may have a tab that says Scan Rate or Refresh Rate or one with a manufacturer's name on it. Check this tab to see if there is a setting for the refresh rate. Set this for 60 Hz. In Windows 98 click on the Advanced button (figure 8) to see the dialog box below. Click the down arrow in the Refresh Rate box. Select 60 Hz. If there is no setting for 60 Hz, select Adapter default.
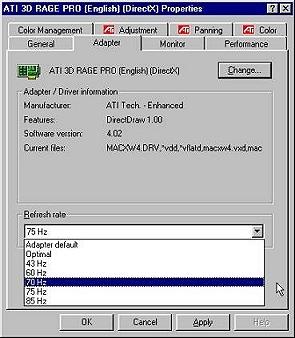
Figure
9 - Windows 98 Advanced dialog box showing the
Adapter card and the Refresh Rate setting
To change your monitor type, click on the Monitor tab. Note the current monitor setting is shown next to the icon at the top left of the card (figure 10) and in the Wizard box in (figure 11).
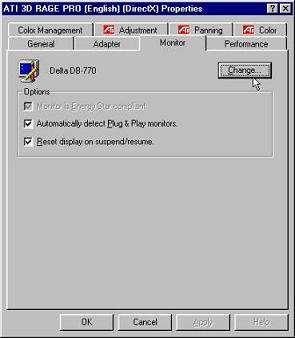
Figure 10 - Monitor
card - click change
Click the Change
button on the Monitor tab to access the change dialog box. Windows 98 will give
you two Wizard boxes before you come to the change monitor box settings (figure
13).
|
|
 |
|
Figures 11 & 12 - Wizard boxes - click next and then click the bottom radio button |
|
Click the Radio Button "Show all hardware"

Figure 13 - Windows
98 Update Wizard (Win 95 Change Display
Type)
showing how to change
display type.
For the original version of
Win95 click on Change Display Type and set the Monitor Type
to Standard VGA 640x480. In the newer versions of Windows 95, use
the Advanced Properties button. Windows 98 has an Advanced
button (see above). In Windows 95/98 you will find a drop down box at the bottom
of the Adapter tab. Click on the down arrow. You may see a
listing of scan rates, select 60 Hz, or select Adapter
Default.
You must set
the TV for the proper source. Normally the TV is looking for input
from the antenna or cable connection. You must set it to look at the auxiliary
input on the rear of the TV. This is where you have connected the video
cable from your scan converter. This setting may be in a menu or on a button on
the remote. It is most often a button on the remote. If you are connecting to a
VCR you must select it's external input. This is done with the
remote or the VCR's menu system, or with a special channel such as 00. In either
case you may have to refer to the unit's manual for proper setup. Refer to your
TV or VCR manual to determine how to switch your equipment to the video mode.
One clue is that you must NOT see a channel number on your TV screen - it
must have something like: video, line, aux, etc. Please refer to a
separate document on TV/VCR video mode switching. Please Reference There is a chart
on our website listing many brands and their method of switching.
If you are using a laptop computer you must set the computer to output the video signal to the external monitor port. This is usually done with the Fn key and one of the F1...F12 keys. The key is usually labeled LCD/CRT or CRT or has an icon of a computer monitor. There is a chart on our Web site listing many brands and their method of switching.
This hot key combination (Fn + F#) usually has three settings:
a) Internal only (LCD)
b) Both internal and external (Simultaneous or Dual Display mode)
c) External only (CRT)
When set to the external
only display (CRT) mode, the LCD screen will go black. This
mode is most often required. Some laptops will not output the
proper 60-hertz signal when in the "simultaneous" display mode.
Switching to external only mode usually resolves the problem. For further
information, refer to your manual or contact the laptop manufacturer's tech
support. There is a chart
on our website listing many brands and their method of switching.
Connecting a VGA monitor to the scan converter is not necessary for operation of the unit.
The VGA pass-through is not
required to use the scan converter. If using this device with a laptop, a VGA
monitor may not be wanted or available. If you are experiencing a problem
with your VGA monitor attached to the VGA pass through on your scan converter,
there may be something wrong with the unit. You should be able to view your PC
monitor just as you did before the scan converter was attached.
Note: The software included with your scan converter is optional software for sizing and moving the TV image. It is not needed to operate the scan converter. It is not necessary to install the software included on the supplied diskette to use your scan converter. If you have not installed the software and are having trouble getting your scan converter work properly, installing the software will not help. It is recommended that you get the scan converter working before you install the software - in most cases it is not needed. Refer back to the Hardware Installation section and System Setup to correct any problems.
This software gives you a screen control utility that allows you to position the TV image right, left, up and down. It can also resize the image to better fit on your TV screen. In most cases, this software is not needed. Most modern TV's no longer need any position correction. The sizing can best be done in Windows itself or within specific applications.
Sizing can be done in three ways:
There is much more
"sizing" information here.
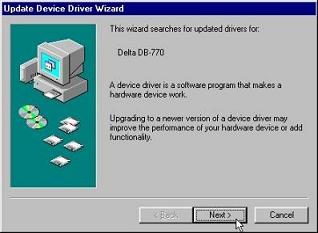
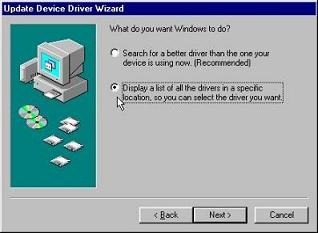
To install your scan converter software in Windows 95 or 98 follow these steps:

Figure 14 - Run dialog box
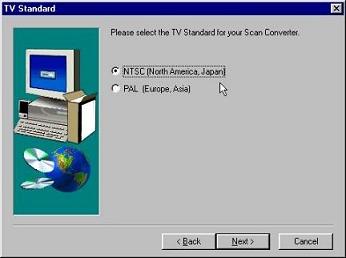
Figure 15 - select TV standard
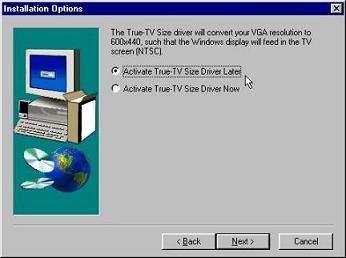
Figure 16 - click NEXT - do not change
Click Next to continue…
DO NOT CLICK THE "Activate True-TV Size Driver Now" selection.
Note: this option has been removed in later versions.
You can determine later if this option is needed. Clicking the Activate Now option can cause an incomplete installation if your video driver is not supported by the True-TV driver.
Updating the display driver changes your previous setting of 640x480 to 600x440. This shrinks the image to better fit the TV screen. When you want to return to normal computer use when done with the scan converter, click the Restore Driver icon (see below).
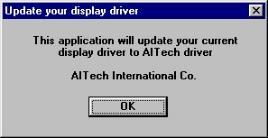
Figure 17 - Update Driver dialog

Figure 18 - Restart dialog

Figure 19
- Update warning
At this stage
you have two options - leave things as they are and work around any size issue
you may have; or change to the Standard VGA driver so you can use the True-TV
Size driver. Note: We do not recommend changing your video adapter's driver
to Standard VGA. Standard VGA will be limited to 16 colors. For most
applications, 16 colors produce an "ugly" looking image. This is the
main drawback of the standard VGA driver, but it is compatible with the
sizing software.
WRITE
DOWN ALL SETTINGS BEFORE MAKING ANY CHANGES.
Please see this document on
our Web site dealing with sizing issues. If you decide to change your video
display driver so you can resize your TV image, you MUST write down
your current settings before changing to the Standard VGA Driver. If you
change this driver and do not know what the original driver is, DO NOT
call AITech Tech Support because we cannot help you. You must call the maker of
your computer system to find out what the original driver is, so that you can
restore it. You also may need to have your Windows CD and video card
drivers handy to reinstall your video driver.
When you are ready to set your system back to regular use, restore the driver to its original settings.
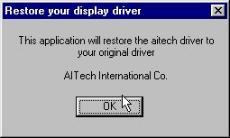
Figure 20 - Restore dialog
Figure 21 - Restart dialog
If you try to restore the driver when the AITech driver is not installed you will get a warning box similar to the one shown below.
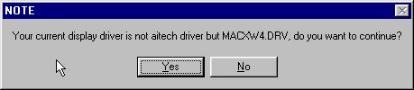
Figure 22 - Warning
To bring up the position controls right click on a blank area of your desk top - click Properties at the bottom of the menu - click on the TV Out Tab as shown below.
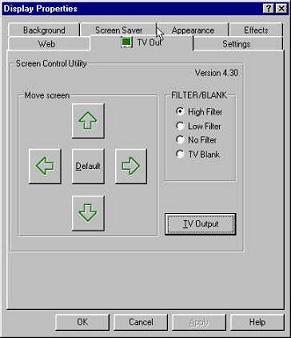
Figure 23 - TV Out card
It is recommended that you
DO NOT use the TV out button. This will make several changes to your system
without you being able to note the current settings. If you have read the System
Setup section and followed those instructions, you have already
made the necessary changes to enable your scan converter to work properly.
It is important for you, the
new owner of an AITech scan converter, to understand that your $300 television
cannot do the work of a $500 (or even $200) VGA computer monitor. A (relatively)
inexpensive TV does not have the bandwidth (electronic capability) to display
the fine text used in Windows and Windows applications. The text you see under
the Windows 95/98 desktop icons is the finest text you will see in Windows.
Unfortunately, this is the first thing you see when you test out your new scan
converter. Please use your scan converter for the purpose you purchased it for
before you decide that the output to the TV is not what you think it should be.
|
General |
What you see displayed on your TV screen is a function of that TV. Some TV's are better than others are, and this is not always a function of the cost of that TV. There are several controls on the TV that can enhance the display you see. Adjusting for color, sharpness, contrast, and brightness can help enhance the image coming from the computer. Also, be sure to use the S-Video cable to connect the scan converter to the TV whenever possible. The S-Video signal will produce a slightly higher quality image than the RCA/composite signal.
You can opt for using large text within Windows (see figure 25, 26). For applications like PowerPoint, games, displaying pictures, working with graphics, or surfing the web, your scan converter will work well for you. Applications such as word processing, database work, and other programs that use a very fine text may be difficult to use when viewed on a TV. This can usually be resolved by choosing a large or bold font.
You can select a larger font for displaying the Internet pages you are showing on the TV. Click View - Fonts - and select a larger font to your liking. Note that Medium is the default font size for the normal screen view.

Figure 24 - Setting the font size in Internet Explorer
In Windows you can specify the font you use for the different areas of the Windows Desktop. To get to your Display Properties just right click a blank area of your desktop - click Properties at the bottom of the menu - and click the Appearance tab at the top of the dialog box as shown below.
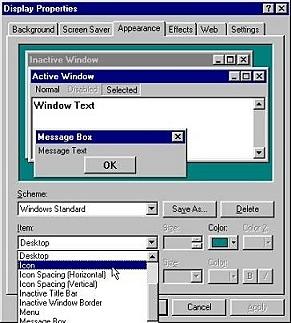
Figure 25 - Selecting the Icon properties
Please note the graphic above that shows you how to set the font for the different areas of the Windows. Note the Item list shown dropping off the bottom. This list will allow you to change the appearance of virtually all areas of your desktop. For the purpose of these instructions, you will only be interested in changing the font size for the Icons.

Figure 26 - Setting the Icon font size
The graphic above shows you
how to change the size of the font. Select the size you think will work and
click the Apply button. If this setting is not suitable
for your needs choose one higher or lower that you like better. Note that the
default font size is 8-point text. Standard printed text is 12-point. The list
goes up to 18-point text but this setting may be too large. Click the OK
button when you find a font size that you like.
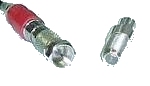
Installing the scan converter on a Macintosh requires the use of the two supplied adapters. Note that one is longer than the other is. The longer adapter is connected between the Macintosh and the scan converter (#1 below); the shorter adapter connects between the Mac monitor and the scan converter VGA output connector (#2 below). Note that some Macintosh models may not require the use of both of these adapters.
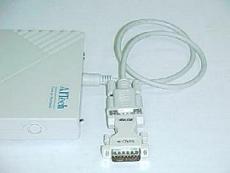
Figure 27 - Showing
how to connect the Macintosh input adapter to the
scan converter. The Mac In side of this connector connects to your
Macintosh VGA (monitor) output connector.
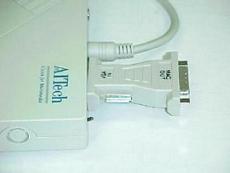
Figure 28 -
Shows how the Macintosh output adapter attaches to the VGA Out
connector on the
scan converter. Connect your Mac monitor to the "Mac Out" side of the
adapter.