|
- How do I install the power adapters?
- What versions of Windows is the Aigotcha2 compatible with?
- Can I use the AIGotcha!2 with my scanner and Zip drive and printer?
- Why can't I capture anything?
- Why do I get a black screen?
- Why do I have a green screen?
- Why do I have black spots in my image?
- I have a split screen and the halves are reversed.
- How do I change my printer port mode?
- What does "Hardware Initialization Failed" mean?
- Why can't I print?
- Why does my keyboard power adapter not fit with the AIGotcha2 installed?
- What is the short 'printer' cable for?
- Will it work with a laptop?
- What is TWAIN?
- Why can't I set my printer port like it shows in the manual?
- Can I attach it to my Laptop?
- Can I use my AIGotcha2 with NetMeeting?
- How do I use the AIGotcha2 for video conferencing?
- How do I get my file associations back to where they were?
- Parts
How do I install the power adapters?
You should have received two power adapters with your AIGotcha2! One for the older and larger AT style keyboard and one for the newer and smaller PS/2 style keyboard connector. You must remove the keyboard connector you have from the computer, insert the adapter and then reconnect the keyboard to the other end of the adapter. Optionally you can connect the adapter to the keyboard connector and then insert the whole thing into the computer connector on the rear of your system case.
For laptops please see Can I attach it to my Laptop? below.
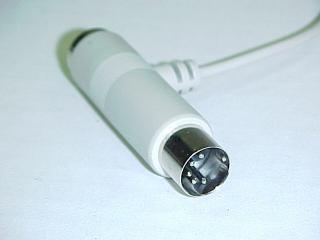
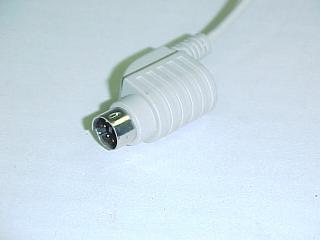
Please note the two types of connectors in the images below.
|
|
|
|
Larger AT (or ISA) Power Adapter - 5 pins |
Smaller PS/2 Power Adapter - 6 pins |
What versions of Windows is the Aigotcha2 compatible with?
The Aigotcha2 software is compatible with Windows 3.11, 95, 98, ME, and Windows NT. It is not compatible with Windows 2000.
Can I use the AIGotcha!2 with my scanner and Zip drive and printer?
The simple answer is yes. The complicated answer is that it may work with any one of these devices but my not work with ALL of them attached at the same time. The printer port was not designed to have several peripherals all stacked up and attached to it. It was designed for outputting data to a printer. The AIgotcha!2 has been tested with several scanners as well as the Zip drive and is know to be compatible with these devices. It is impossible to test with every scanner and printer on the market. For the most part we are confident that the AIGotcha!2 is compatible with most parallel port devices. HOWEVER, please not that when you hang three or four devices on the printer port you may be introducing problems that will not easily be resolved. The simplest way to make sure that all devices will work is to put your printer and the AIGotcha!2 on your integrated printer port (LPT1) and install the scanner and Zip drive on a second printer port.
Please note that there are several all-in-one printers being sold at this time. These are the printers that are printer, fax, scanner, copier, etc... These types of devices may cause a problem because they want to OWN the printer port. This is because they are always looking to get some input from the device. Only ONE device can logically talk to the printer port at a time. If your printer/fax software is constantly polling the port, then the AIgotcha!2 cannot talk to the port. This is much like someone calling you on the phone when you are talking to someone else - they get a busy signal. In the example above, the AIgotcha!2 will get a busy signal and report that it cannot initialize the hardware ("Hardware Initialize Failed" error message). In this case you will need to install a second printer port to attach the AIgotcha!2. Or, you may be able to find some way to stop the printer/fax/scanner software from trying to communicate with the port. Please refer to the AIGotcha!2 Troubleshooting document for more information on printer ports.
There are several reasons why you may not be able to capture an image with your AIgotcha!2 - the answer depends greatly on what you see in the capture preview screen. Please go through the questions and answers below based on what you are seeing in the preview screen when you try to capture an image.
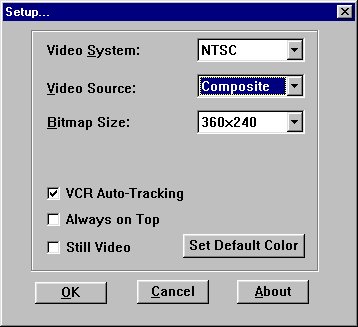
A black screen indicates that your video source (camera or VCR) is either not attached to the AIgotcha!2, or that it is not turned on. Many new cameras will turn themselves off after a period of inactivity. Another cause of a black screen is that you may be using the S-Video input on the AIgotcha!2 unit and you have not selected that source input in the AIgotcha!2 setup. Click on the small blue square button at the bottom of the preview screen and select S-VIDEO for the source.
The actual why for green screen is unknown but in most cases it is fixed by changing your printer port mode to ECP. This is explained below in 'How do I change my printer port mode?' Please also see AIGotcha2 Installation.
Why do I have black spots in my image - mostly around the edges of items?
The answer to this is the same as for the green screen above - the most often cause is from the mode setting for your parallel port. In most cases it is fixed by changing your printer port mode to ECP. This is explained below in 'How do I change my printer port mode?' below. Please also see AIGotcha2 Installation.
I have a split screen and the halves are reversed - how do I fix this?
The split screen is causes by a timing mismatch. What you see is not really a split and reversal of the image but the second half of frame A and the first half of frame B. In most cases this is fixed by changing your printer port mode to ECP. This is explained below in 'How do I change my printer port mode?' below. Make sure you do not have a switch box or other device installed between the AIgotcha!2 and the printer port. Please also see AIGotcha2 Installation.
How do I change my printer port mode?
This is not always an easy question to answer. The reason for this is that all computers are different. There are many ways to get into the BIOS setup program. Usually you will see a notation on the screen when the computer first boots up. This will be within the first few seconds after the screen comes on. It will look similar to "Press F1 for setup" or "Press Alt+Esc to enter setup". You must do this quickly - you will only have a few seconds to press the correct key combination after you see the instructions. If you cannot get into the BIOS Setup (do not see the instructions described above), you will have to call the company that made your computer and have them lead you through the procedures for changing your port mode. Check in your users manual as you might have instructions for doing this there.
Once in the BIOS setup you will want to look for the ADVANCED settings or a menu item that looks like Peripheral Setup, Integrated Peripherals, Integrated I/O, I/O setup, or something similar to this. Select this using the arrow keys and press enter. Look for the area that shows your Parallel Port or Printer Port. You will find three settings there. The first will be the address. You will want to make sure it is set at 378 h. You will also see the IRQ setting, make sure it is IRQ 7, and lastly the mode (sometimes called the type) should be set for ECP.
In some cases you may have to change to a different mode in an effort to get your port working with the AIgotcha!2. If you are using version 2.03 software you should be using the ECP mode, however on some computers you may need to select a different mode to get the AIgotcha!2 to work properly.
Once the settings are made follow the instructions for saving them and exit the BIOS. When the computer starts to boot again, turn off the computer for 10 seconds to reset the AIgotcha!2.
What does "Hardware Initialization Failed" mean?
This error is means that the software failed in its attempt to initialize the AIgotcha!2 device. Make sure that the power adapter is attached to the AIgotcha!2 and installed in the keyboard connector properly. The HIF error is also an indicator that the software cannot communicate with the device because of the hardware port itself. Some times a printer port mode change will fix this. Frequently changing to ECP mode will stop this error. If the AIgotcha!2 device is not functioning it may cause this error. If this is the case you will need to return it to your vendor for a replacement or call our tech support number for more help.
There may be several reasons that you cannot print when your printer is attached to the AIgotcha!2. The most common reason is that you have your TWAIN source activated. When you start the AIgotcha!2 software you get a blank screen. When you click the blue activate button (or click file and acquire) the preview screen pops up. This is the TWAIN interface. When the TWAIN source is activated it "owns" the printer port and nothing else can use it. In this same manner, if the printer is printing the TWAIN source cannot activate the AIgotcha!2. Only one device can use the printer port at any one time. The key here is that you must deactivate the TWAIN interface by clicking the large green button on the left edge of the little TV screen. Notice that the printer button is grayed out and when you turn off the preview screen it lights up. It is recommended when you want to print that you always click the blue button first because the TWAIN interface may be in the background behind the main screen and then turn off the TV with the green button. Whenever you click on one of your captured images the TWAIN interface will drop to the background. If you can't see it you may assume it is ok to print. In this case you won't be able to print because the TWAIN interface is still active. Clicking the blue activate button (just below the FILE menu) will always bring it forward so you can deactivate it.
The printing feature provided in the AIgotcha!2
program was intended as a preview facility only. When
you print an image from the AIgotcha!2
software it will always
print it in a large half page format. It will appear pixilated and unclear if viewed close up. For best results printing an
image it is recommended that you use a third party image editor
or photo editor. Windows Paint (in your accessories menu) will print
the image just as captured - in the size as it was captured.
As an example, if you capture in the default 320 by 260 {check this} image size,
you will get an image approximately in the form of a 2.5 by 3.5 inch rectangle.
This is how it should print, but the AIgotcha!2
print will give you a print that
is nearly a full half page in size.
Why
does my keyboard power adapter not fit with the AIGotcha2 installed?
Some manufacturers put their port connectors very close together on the motherboard. In some cases the cord strain relief on the side of the adapter interferes with either the AIgotcha!2 device or your mouse. On some laptops it is very difficult to connect all the devices together on the back of the laptop. If you find that you are having difficulty making the proper installation connections on your computer please send us an e-mail tech_support@aitech.com and explain the problem. You will notice that the AIgotcha!2 came with a short (about 8 inches) cable that goes between the AIgotcha!2 and the computer. This cable will help in mounting the device to the computer. The connectors are smaller and allow attachment in the small quarters.
What is the short 'printer' cable for?
The AIgotcha!2 extension cable was provided to give you an option for attaching the device to the computer when other attachments made this difficult or impossible. The extension cable also gives the computer some strain relief to the printer port itself. When you have the AIgotcha!2 on the port by itself there is little physical strain on the port, but when you install a scanner and a printer the load gets pretty heavy. The extension cable lets this load hang down off the computer instead of acting as a lever against the port. A third convenience feature of the extension cable is that for some in-desk installations or other tight placements the computer may not have enough room with the AIgotcha!2 sticking out the back - the extension cable allows the AIgotcha!2 to hang down and take up little room behind the computer, thus allowing the computer to fit better in its enclosure.
Yes. There is little difference between the operation of a desk top computer and a laptop. There are only two issues involved with using the AIgotcha!2 on a laptop. The first is physical attachment of the device to the computer. This has been taken care of with the extension cable provided with the AIgotcha!2. Laptops are small and also make it difficult to attach different items to the rear of the computer. The second issue with laptops is power. You must attach the adapter to the PS/2 connector on the rear of the laptop. In some cases it may not fit. Some laptops do no put out enough voltage for the AIgotcha!2. In this case you can request an external power adapter from the AITech Tech Support department. See also Can I attach it to my Laptop?
TWAIN stands for Technology Without An Important Name. TWAIN is a standard used by peripheral manufactures to allow you to use your scanner or camera or capture device or AIgotcha!2 within other programs. The idea is that if you are using a picture or photo editor program that is TWAIN compliant (such as PhotoShop) you should be able to use your peripherals from within this program and not have to start the software for that device, use it, then load the file into your editor. In most cases this works well but TWAIN is not perfect and not all devices will work perfectly from within all programs.
Why can't I set my printer port like it shows in the manual?
The manual shows the setup dialog box (page 2-6) with a setting for the parallel port address. This image was captured form the original version of the software (version 2.0). Version 2.02 and above do not have this setting available. The setting is no longer necessary and allows you to change the port that you attach the AIgotcha!2 device to with no concern of changing settings. The AIgotcha!2 device is searched for by the software and the setting is made internally and automatically.
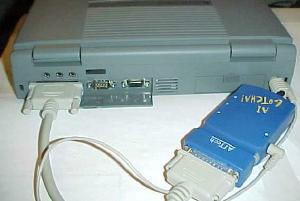
Yes! The only consideration is the power adapter. See photo for example. Most laptop computers have a PS/2 keyboard/mouse connector on the rear of the laptop. We are aware that some laptops have a lower voltage than that required by the AIgotcha!2 device. The AIgotcha!2 requires 5 volts, while some laptops supply only 3.5 volts. If this is the situation in your case you can call our tech support to get an external power adapter so your AIgotcha!2 will work with your laptop. With most laptops it will be necessary to use the supplied extension cable in order to mount the AIgotcha!2in the tight confines of the laptop connectors.
Can I use my AIGotcha2 with NetMeeting? See below.
How do I use the AIGotcha2 for video conferencing?
To use your AIGotcha2! with NetMeeting or other video conferencing software you must first install the AVI driver. This driver is on your installation CD if you have version 2.03 AIGotcha2! software. If your CD has a lower version number, you can download the driver from the Software Download area of this web site. There are no settings associated with this driver. All settings will be in your video conferencing software.
How do I get my file associations back to where they were?
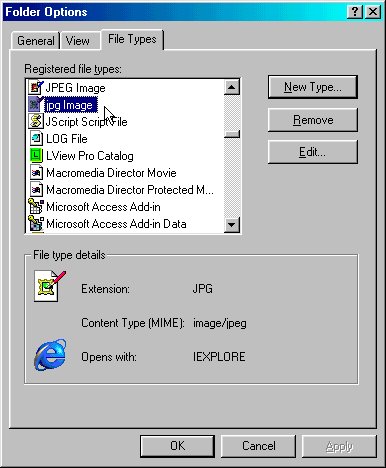
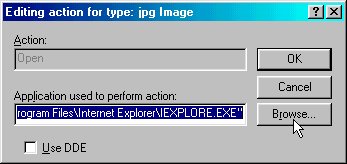
When you installed the AIGotcha2! software, many of your graphic file type associations were changed to work with the AIgotcha!2 software. If you want to put one or more of these associations back to where they were (usually your Internet browser) you can do so easily. Follow the instructions below.
|
Figure 1 - File Type dialog box showing .jpg selected |
|
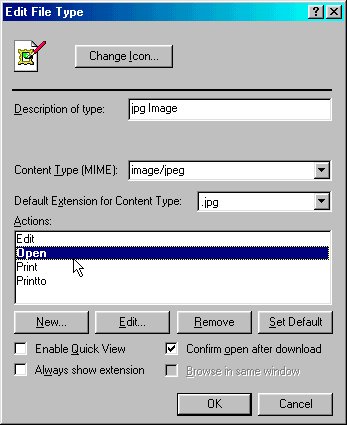
Figure 2 - showing Open action selected |
|
Figure 3 - showing browse for desired program .exe |
Last update 9-18-02